Friday, January 31, 2014

Ultimaker2 3D printer

So after 2 months of waiting i finally received my Ultimaker2 the 3D printer!
It came in a big box like so:
On top there were the materials, to begin with i had a red ABS, skyblue&translumniscentgrren PLA.

Here is a bad photo of some other accessories for the printer:
The manual is printed in a high quality and is very clear, it even offers some troubleshooting solutions.
Included is also: Lube, spool(holds the material), Allen keys, stickers, more stickers, stick glue, computer cable, power supply and a test print made by the printer at the factory.
Getting the printer to run is easy, it takes about 10min.
When turned on it looks like this:
The only problem i encountered was leveling out the platform, at first i didn't level it correctly and parts on the left side got separated from the platform destroying the print.

The stick glue supplied with the printer is there so u put some on the build platform so that the abs parts stick.
PLA is not that problematic, as it sticks to the glass platform, but using glue with small parts is advisable.
Here are some prints:
this is the very first one, a tensioner for f5g boats.
many more, and a prototype pulley
the printer in action
a steering arm for the RC drift car, and an improved pulley
canting keel base, for F5g
An Ice scraper for my car
it is printed at a low quality, the biggest print yet(18x20cm)
and some more action
There is still a lot to learn as the printer has many many things to adjust, such as nozzle temp., speed, build platform temp. etc.

The software i am using is ultimaker's CURA, it is easy to use, just perfect for the ultimaker. It wants .STL files so it can create a G code for the printer to use.

I do not have the printer conected to the computer, becouse if the computer starts to hibernate or shuts down, then the printing is stopped. I use the supplied 2gb SD card as a data source for the printer.


Tuesday, January 14, 2014

Drift cars and such

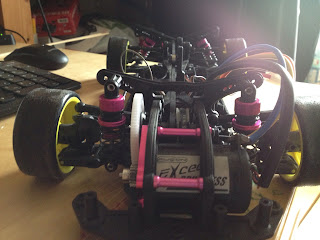
Lately, a lot of time went into rc cars, more specifically two 3racing sakura D3's.
The sakura is a great chassis, everything is adjustabble, the plastic is hard, all the screws are aluminum, with a fine thread, everything fits perfectly and al parts fit perfectly.
I got mine from R2hobbies, for 120$, shipping incl.
No the cheapest countersteer drifter out there but one that can stand up to cars that are three times the price.
Offcourse the it is not prefect, the main belt is too lose, the problem can be fixed, by deleting the rear belt tensioner(the rear can be tensioned via excentric diff holder) and mounting it on top of the upper deck like this:

The pins that hold the CVDs together keep sliding out, despite the screw holding them in place. 
The steering system puts quite a lot of strain on the servo.

The car originally comes with CS, in rc drift world that means that the rears are spinning more than the fronts(1:2.16 in this case). This gives the car a more realistic feel, while having the control of 4wd when drifting.
With the sakura you need a front one way deferential instead of a solid axle, because the way tha components are layed out it is impossible to drift long corners at speed with a solid front axle, you will just spin out.

Another thing is that the antenna tube doses not fit into any of the two given parts for mounting it, so u have to drill one of the in order to fit it.

I have all ways been a fan of rwd rc drifting, because its just real, it ain't cheating like some say.
But a 1/10th scale rc car is a light, supper unstable platform to do that. So it is a challenge, and i like 'em.

During december of 2013 i've slowly been improving the car, using my knowlage obtained from rc car racing and searching the web for tips. the method was trial and error obviously.

So this is where the car is at:
Rears are stock tires on stock rimes(5mm ofset i belive), fronts are ansmann touge, but are identical to the stock, the reason i run them is that they were on a crazy offset rimm(9mm)

The battery is a robitronic 2s, relocated to the back, to give more grip and a smoother drift curve


80g ballast in front for a better steering response

the hubs have been re-drilled, the c hubs are cut to give more room.
this is the max lock, note the big ackermann angle

made of a leftover pice of glassfibre laminate, this skid enables me to jump and attack the curbs(prevents the foam gripping, and spinning the car)
this is a great pistol i am using, it is expensive tho

power comes from a prehistoric tamiya black ecu and a 540 brushed motor

the set up, oil is as by manual, rear springs are sakura orange(stiff) fronts are 1.35mm thick from an old rc car highly important is the shock anglem note the holes on the shock tower

the 9mm offset ansmann wheel, front camber is 8deg, caster is stock
this is the body ia am using, it is not finished yet, the fitment is god, note the rear wheel looks retarded in this picture, the camber is negative not positive
I don't use gyro, maybe will in the future, but for now i like the pure drivers car!

The huge ackermann angle seen above helps the car's stabillity, the inner wheel has always more gripp and gives direction, the outer one stabilises the agressive changes to grip of the inner tire.(inner=the one with more lock)
These agressive changes of grip come from the change in angle of attack that the tire has in refference to the direction in which the car is going. Meaning that the tyre does not always point into the that direction the car is going(cause i dont have 10 milisec reflexes to drive the car around a perfect curve)

here are some running clips from the hallway:

The current car weight is 1307g, which is far to light for good asphalt running, it works well on polished concrete, carpet and at home, but i have yet to find good tyres for the street.
Run time with this battery is 30-35min which is very good.

below is a friend sakura, mostly stock, with a brushless motor, he is waiting for a one way diff but other than that it's running fine with a similar shock set up.(difference= front springs)
The electronics have to bi mounted, and new conectors will be used

a nissan r32 body will  be used with this one, tires will be stocks and those ansmann touges as they are 10€ per set of four.

lock difference between mine and his

Evolution slooowly coming along

Snow white paint should be on the boat by the end of this week, The rudder mechanism is done,
Carbon-fiber sandwitch for the sheeting arm is in the press.
A symbolic keel(alu) is in the boat, a bulb and final touches to the rigg are missing.


Later, a carbon strut(about 2.5cm chord) will replace the keel, a bow rudder will be fitted, similar to this.

Wednesday, January 8, 2014

IOM bits arrived

A month ago i ordered some IOM bits from chrissails.
These are a Dave Creed build keel fin, rudder, mast-finn box and a plain bulb.
Everything was nicely packed and arrived undamaged.
details:
The bulb needs to be sanded, filled and painted, mounting holes have to be drilled.
There seems to be a stainless steel rod through the midle of the casting to prevent bending, it also gives a sharp end to the bulb, Clever :)

The keel's core is foam, in the middle there is a fullcarbon strtut approx. 12x4 mm giving the strenght, the skin seem sto be two layers of carbon on each side, 4 in total.
Thicknes is about 7% of the chord

The rudder is stiff, there are some moulding faults in the lower part, but not a big deal, i dont realy like the shape, because the lover edge, which is a v, does not align with the waterline if the strut is positioned vertically.

Mast-fin box is stiff, weighs 28g
I am happy with the investment, these parts will go into my first IOM boat.
And will be definately used as a reference when designing my own foils.


Friday, December 6, 2013

Own IOM design

After the jif, angel dust rg65s.
An IOM is coming:
This is the first model of the IOM project. The plan is to get the boat on the water in spring and learn about the class. The goal is to attend some international events in the second half of 2015.

About the model,
The hull is designed around a Dave Creed keel finn&bulb, for starters a Creed build rudder will be used.
Jelacic 3D moulded sails will provide the power.

The hull is a low wetted surface design, with a beam of 22,5 cm. Designed with the all popular tumblehome, to reduce the hull area(and weight), but complicate building :(.
It is not a copy of a britpop or fraktal but is designed with a philosophy of it's own.

Chines are soft to reduce drag, the tumblehome is the most extreme around the middle of the boat, lenght-wise, because this is theoretically the part of the hull that provides the most "grip" = reducing leeway.
Also this is the part of the hull where the depression of the waves made by the hull is the deepest so wetted surface area will be reduced when the boat is pressed down-wind(where there is no sinkage and the depression is at its deepest)

The waterline is very narrow at stern, to promote light air performance and shape the waterline into an asymetric wing when heeled, combined with round forward sections this shape should make the hull happy to change direcion.

The finn is quite far forward at midship(centre fo the finn), to insure directional stability in caotic conditions downwind and stable upwind(foil wise).

The above combination should give a boat that feels stable directionally but is happy to manouver when needed.

The hull has lots of reserve volume above the static waterlines, to stay above the waves.
The freeboard goes to a  minimum at stern to reduce hull-weight(also potential windage, but due to the wind gradient i think that there is practically none).
The deck will be flat to make the boat simple. For sheeting an arm servo will be used mounted behind the finn, corrector weights will be placed around the finn-but the final placement s a mater of experimentation.

Tuesday, November 26, 2013

Fuck-up

Today there was a lot of wind, gusting to 25 knots, the temp. Was 1 deg. C.
Ice was building..
Fila went good under B rigg, a little bit overpowered up-wind, so tacking was not the easiest in the 10-15 chop.
Down-wind was a blast!
I came in, to adjust the vang and jib twist, grabbed the boat by the mast, somewhere at the lower shroud.
Aaand it broke..
The sails have survived, but a new mast has to be build. And the new rigg has to be setup, this will take the most time.
The plan is to make a new main sail with a shorter foot, to move the ce of the main closer to the mast, for a more balanced helm when sailing down-wind.
The tradeoff will be a slightly higher CE. 
But will be worth, because broaches will be avoided more easily with a nearly neutral helm diown-wind.

Monday, November 25, 2013

Footy design - thoughts

I have been involved in the footy class for good two years now. till today i've build some 10 footys.
In 4 design shapes: Spade(4boats, 9hulls), Karo(4boats, 2depron ,2carbon+1 carbon hull), Duck(a Gary Sanderson design) and a "proto" the newest model.
The participation in two footy goldcups gave me the chance to try other peoples footys, amongst which are the infamous ICE, Steri, Ranger etc.
Alongside with footy and other sail class activities i've been studying naval architecture by myself. Finding resources in books like Principles of yacht design, Elements of yacht design(skene), Ted Brewer books, and all the literature and technical papers i could find on the web.

This is where my thinking stands today:

Lenght,

The advantage in lwl gain by positioning boat diagonally into the measurment box is minor, not worth trying if technical difficulties appear with generall arangement. But if it suits the boats concept then the boat should be as long as possible.

Width,

Generally there are two types of boat: a narrow one and a wide one, not many footys are found in between.

Imo a narrow boat should have a beam of 70-100mm, less is to little, as sail carrying ability is reduced. A very narrow boat will suffer in gusty conditions as it will be hammered by the gusts(if the rigg is set for the luls) or left behind in the luls(if the rigg is ment for gusts)

A wide boat, 135-153mm of beam. These boats are very "powerfull", they carry lots of sail, and usually sport a ballast of around 250g or less, because more ballast doesn't seem to improve righting moment enough to beat the added weight/drag.

All-up weight,

I went as low as 300g with spade models, but hit problems with tacking, similar problems have been reported by other builders.
The black KARO weighed above 520g, and is the heaviest footy i sailed beside the ICe(can't remember the weight, but it was above 500), and this karo suffered from unresponsivness, and dynamic sinkage due to the forces of sails. With a different hull a heavy boat might perform.

My conclusion is that it is safe to stick below 500g and above 350g, offcourse the boat should be build as light as possible, and ballast should put the boat up to it's full design weight.

Freeboard,

At stem should be as large as possible(7-10cm on boats like SliM, ICE, Steri, Urca and my designs)
at stern it should be 0, or as small as possible to fit the boat in the box with the maximu possible draught.(stern freeboard: 3mm-4cm on my designs and ICE's, urca, steri, duck..)

Hull design details,

The prismatic-coefficient should probably be around 0.6, because this suits an overopowered sailboat.
No speed/angle measurments were made with footys, the only refference could be the internet course, but the conditions are varying and the angles sailed are questionable.
Volume in the front third of the boat is key to downwind performance. Three types of bow are found on footys.
One type has little volume, and a high freeboard, and is designed to be pushed down and cut the water when overpovered downwind(Slim, Karo, Ranger). This type gives stable downwind sailing and is probably just as fast as the moustache found on ices.
Then there is the moustache, seen on ice, awk and bug footys. This bow is pushing the water away from the hull creating lift.
Finally there are footys with lots of volume, these are trying to stay above the water, but usualy don't.
The most effective seems to be the high bow with lesser volume.
The moustache is also succesful on british designs.

Ballast(ratio),

Currently i am experimenting with ballasts of 200, 250, 280, 300, 350g, trying to see how they work on different types of hulls, sometimes the all-up weight is to large...
..al bulbs have cg on the same chord lenght of the finn and approximatelly the same shape(something like a naca 64 xx)

It seems that 200-250g work well on wide boats like spade and proto, with the 300g bulb there is already a significant loss in performance upwind, tho the two boats are much more stable when sailing downwind with a heavier bulb. Note: spade was designed for an all-up weight of 380g with a 200g bulb, protos all-up was to be 420 but works best at 375g with a 200g bulb.

The 280g bulb works best on the KARo the 300g bulb can be used for waves and stronger winds, the 350g bulb is to heavy for all of my designs and is waiting for use in a future project.
250and 200g are to light as the 2000sqcm a rigg heels the karo way too much, and tacking in waves is compromised.

Ballast ratios for footys seem to reach from 40% to almost 70% of the all-up weight, light footys are build just as light as the heavier ones, and that is the reason for their lower % of ballast, they simply have less lead.
Generally 50-65% of ballast/all-up weight is a good result.
Two exaples:
Karo, all-up:500g ballsat:280g ratio: 56%(depron boats had a better ratio due to lighter hull)
Spade, all-up:380g ballast 200g ratio:52%
Data fot further comparison here
Note: often it is better to add some weight in order to make the boat more user friendly, e.g. hatches, switches instead of tape.

Draught,

should be maximized, the theories about lower wetted surface with a shorter finn don't work in the real world, footys are all about POWER a.k.a. sail carrying ability.

Rudder size,

I got good results with 50sqcm and bigger rudders. Some footys use smaller rudders with a very high aspect ratio, and they work well, but if the boat is not perfectly balanced they stall in caotic conditions and the boat loses control.
Karo is sporting a 75sqcm rudder. It's big, bigger than needed but reliable when tacking, waitng at the start etc.
All in all a big rudder does no harm, it reduces leeway, makes handling easier and does not slow the boat down much because of all the sail power available.
Another tip is to have a rudder that is at least 15cm deep(from wl), so when the boat pitch-poles downwind, 2-3cm of the rudder stays in the water and control is not lost.

Keel finn,


Due to the low Re footys experience the profile should have a fine entry, the max thickness should be 10-12% of chord, less seems to be risky due to the big leeway angle when accelerating/drifting in light airs.
The planform area on my designs is about 60cm^2(325 size heli rotor blade), this is also the lowest advisable area, less than this does not provide enough sideforce. Leeway increases.
For non chined hulls or hulls with flat sides which provide less "grip" under heel an area of up to 90cm^2 can be used.
A big finn reduces tacking ability, so a boat should have either a small rudder and a small keel finn or both of a bigger area. 
The keel finn shoul be set far aft to move the CE back. The bulb CG must match the LCB of the hull or be set for max 15mm aft of the LCB on the vertical axis(the -15mm option will increase weather helm and reduce nosediving down-wind.

Rigg sizes,

The rigg size is increasing from year to year as the boats are refined.
at the moment the sizes are: A+(light air rigg) 2000-2700sqdm, A 1400-2000sqcm, B 900-1400.
c-rigs are rarely used but generally measure for 500-900sqcm, stormriggs are below 500sqcm.
Going above 75 cm of rigg height above deck rises the CE to high, so that should be a good upper limit for all but the A+ rigg.
The sails should cover as much of the boat lenght as possible, meaning that the whole rigg should not be 20cm wide but more like 50cm wide, this balances the boat better for upwind sailing(it gets more directional stability, and is not as twitchy)
High aspect ratio should be kept if possible!

Servos/Rx/Battery,


Most of footys use 9g servos for rudder and sheeting.
For the rudder a 4.5g servo is more than enough, saving 5g of weight.
In the past standard servos were used for the sheet, but there is no need for such a heavy servo, aspecially if the boat is sporting balanced una or swing riggs(a nominal power of 2 kg will do)
With classical riggs a "2.5kg" strong servo should be used.
The above is my experience with a 6.5-7cm long servo arm and direct sheeting.
The Rx should be as light as possible to save weight and space.(weight under 10g is exelent, under 25g is good)
The battery can be a 1s lipo of up to 1000mAh, weight approx.: 26g
Four AAA are also commonly used but are abit heavier.
A on/off switch is welcome, to improve user-friendlyness.

To sum up, the above are just some measurable parameters that work with footy class sailboats.
At the moment i am not sure what is the fastest footy type.
Speed seems to come from the overall package. Such a package can be achived using different approaches:
Like ice(design by Roger Stollery), a relatively heavy and beamy design, which handles downwind with moustaches.
The rigg is a swing, with enough power to overcome the high weight


Or SLiM, a Phil Tyler designed and build narrow boat, of medium diplcement. Going downwind with a narrow cutting bow and a efficient una rigg.
More here