So after 2 months of waiting i finally received my Ultimaker2 the 3D printer!
It came in a big box like so:
On top there were the materials, to begin with i had a red ABS, skyblue&translumniscentgrren PLA.
Here is a bad photo of some other accessories for the printer:
The manual is printed in a high quality and is very clear, it even offers some troubleshooting solutions. Included is also: Lube, spool(holds the material), Allen keys, stickers, more stickers, stick glue, computer cable, power supply and a test print made by the printer at the factory.
Getting the printer to run is easy, it takes about 10min. When turned on it looks like this:
The only problem i encountered was leveling out the platform, at first i didn't level it correctly and parts on the left side got separated from the platform destroying the print.
The stick glue supplied with the printer is there so u put some on the build platform so that the abs parts stick.
PLA is not that problematic, as it sticks to the glass platform, but using glue with small parts is advisable.
Here are some prints:
this is the very first one, a tensioner for f5g boats.
many more, and a prototype pulley
the printer in action
a steering arm for the RC drift car, and an improved pulley
canting keel base, for F5g
An Ice scraper for my car
it is printed at a low quality, the biggest print yet(18x20cm)
and some more action
There is still a lot to learn as the printer has many many things to adjust, such as nozzle temp., speed, build platform temp. etc.
The software i am using is ultimaker's CURA, it is easy to use, just perfect for the ultimaker. It wants .STL files so it can create a G code for the printer to use.
I do not have the printer conected to the computer, becouse if the computer starts to hibernate or shuts down, then the printing is stopped. I use the supplied 2gb SD card as a data source for the printer.
Lately, a lot of time went into rc cars, more specifically two 3racing sakura D3's.
The sakura is a great chassis, everything is adjustabble, the plastic is hard, all the screws are aluminum, with a fine thread, everything fits perfectly and al parts fit perfectly.
I got mine from R2hobbies, for 120$, shipping incl.
No the cheapest countersteer drifter out there but one that can stand up to cars that are three times the price.
Offcourse the it is not prefect, the main belt is too lose, the problem can be fixed, by deleting the rear belt tensioner(the rear can be tensioned via excentric diff holder) and mounting it on top of the upper deck like this:
The pins that hold the CVDs together keep sliding out, despite the screw holding them in place.
The steering system puts quite a lot of strain on the servo.
The car originally comes with CS, in rc drift world that means that the rears are spinning more than the fronts(1:2.16 in this case). This gives the car a more realistic feel, while having the control of 4wd when drifting.
With the sakura you need a front one way deferential instead of a solid axle, because the way tha components are layed out it is impossible to drift long corners at speed with a solid front axle, you will just spin out.
Another thing is that the antenna tube doses not fit into any of the two given parts for mounting it, so u have to drill one of the in order to fit it.
I have all ways been a fan of rwd rc drifting, because its just real, it ain't cheating like some say.
But a 1/10th scale rc car is a light, supper unstable platform to do that. So it is a challenge, and i like 'em.
During december of 2013 i've slowly been improving the car, using my knowlage obtained from rc car racing and searching the web for tips. the method was trial and error obviously.
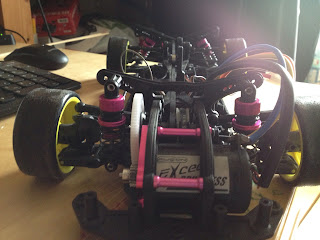
So this is where the car is at:
Rears are stock tires on stock rimes(5mm ofset i belive), fronts are ansmann touge, but are identical to the stock, the reason i run them is that they were on a crazy offset rimm(9mm)
The battery is a robitronic 2s, relocated to the back, to give more grip and a smoother drift curve
80g ballast in front for a better steering response
the hubs have been re-drilled, the c hubs are cut to give more room.
this is the max lock, note the big ackermann angle
made of a leftover pice of glassfibre laminate, this skid enables me to jump and attack the curbs(prevents the foam gripping, and spinning the car)
this is a great pistol i am using, it is expensive tho
power comes from a prehistoric tamiya black ecu and a 540 brushed motor
the set up, oil is as by manual, rear springs are sakura orange(stiff) fronts are 1.35mm thick from an old rc car highly important is the shock anglem note the holes on the shock tower
the 9mm offset ansmann wheel, front camber is 8deg, caster is stock
this is the body ia am using, it is not finished yet, the fitment is god, note the rear wheel looks retarded in this picture, the camber is negative not positive
I don't use gyro, maybe will in the future, but for now i like the pure drivers car!
The huge ackermann angle seen above helps the car's stabillity, the inner wheel has always more gripp and gives direction, the outer one stabilises the agressive changes to grip of the inner tire.(inner=the one with more lock)
These agressive changes of grip come from the change in angle of attack that the tire has in refference to the direction in which the car is going. Meaning that the tyre does not always point into the that direction the car is going(cause i dont have 10 milisec reflexes to drive the car around a perfect curve)
here are some running clips from the hallway:
The current car weight is 1307g, which is far to light for good asphalt running, it works well on polished concrete, carpet and at home, but i have yet to find good tyres for the street.
Run time with this battery is 30-35min which is very good.
below is a friend sakura, mostly stock, with a brushless motor, he is waiting for a one way diff but other than that it's running fine with a similar shock set up.(difference= front springs)
The electronics have to bi mounted, and new conectors will be used
a nissan r32 body will be used with this one, tires will be stocks and those ansmann touges as they are 10€ per set of four.
Snow white paint should be on the boat by the end of this week, The rudder mechanism is done,
Carbon-fiber sandwitch for the sheeting arm is in the press. A symbolic keel(alu) is in the boat, a bulb and final touches to the rigg are missing.
Later, a carbon strut(about 2.5cm chord) will replace the keel, a bow rudder will be fitted, similar to this.
A month ago i ordered some IOM bits from chrissails. These are a Dave Creed build keel fin, rudder, mast-finn box and a plain bulb.
Everything was nicely packed and arrived undamaged.
details:
The bulb needs to be sanded, filled and painted, mounting holes have to be drilled. There seems to be a stainless steel rod through the midle of the casting to prevent bending, it also gives a sharp end to the bulb, Clever :)
The keel's core is foam, in the middle there is a fullcarbon strtut approx. 12x4 mm giving the strenght, the skin seem sto be two layers of carbon on each side, 4 in total. Thicknes is about 7% of the chord
The rudder is stiff, there are some moulding faults in the lower part, but not a big deal, i dont realy like the shape, because the lover edge, which is a v, does not align with the waterline if the strut is positioned vertically.
Mast-fin box is stiff, weighs 28g
I am happy with the investment, these parts will go into my first IOM boat.
And will be definately used as a reference when designing my own foils.